
Why Connect Quizify with Omnisend?
With the Quizify–Omnisend integration, you can:- Automatically sync new quiz leads to your Omnisend audience lists in real time.
- Collect complete customer information such as Email, First Name, Last Name, and Phone Number.
- Send answer tags and result data for laser-focused subscriber segmentation.
- Keep your Omnisend subscriber lists updated continuously without manually exporting or importing CSV files.
- Create personalized email campaigns and automated Omnisend workflows based on quiz responses and product recommendations.
How to Sync User Data from Quizify to Omnisend
1. Enable User Email in Your Quiz
Add a User Form to your quiz and enable the Email field. The Email field must be set to Required for user data to be synced with Omnisend.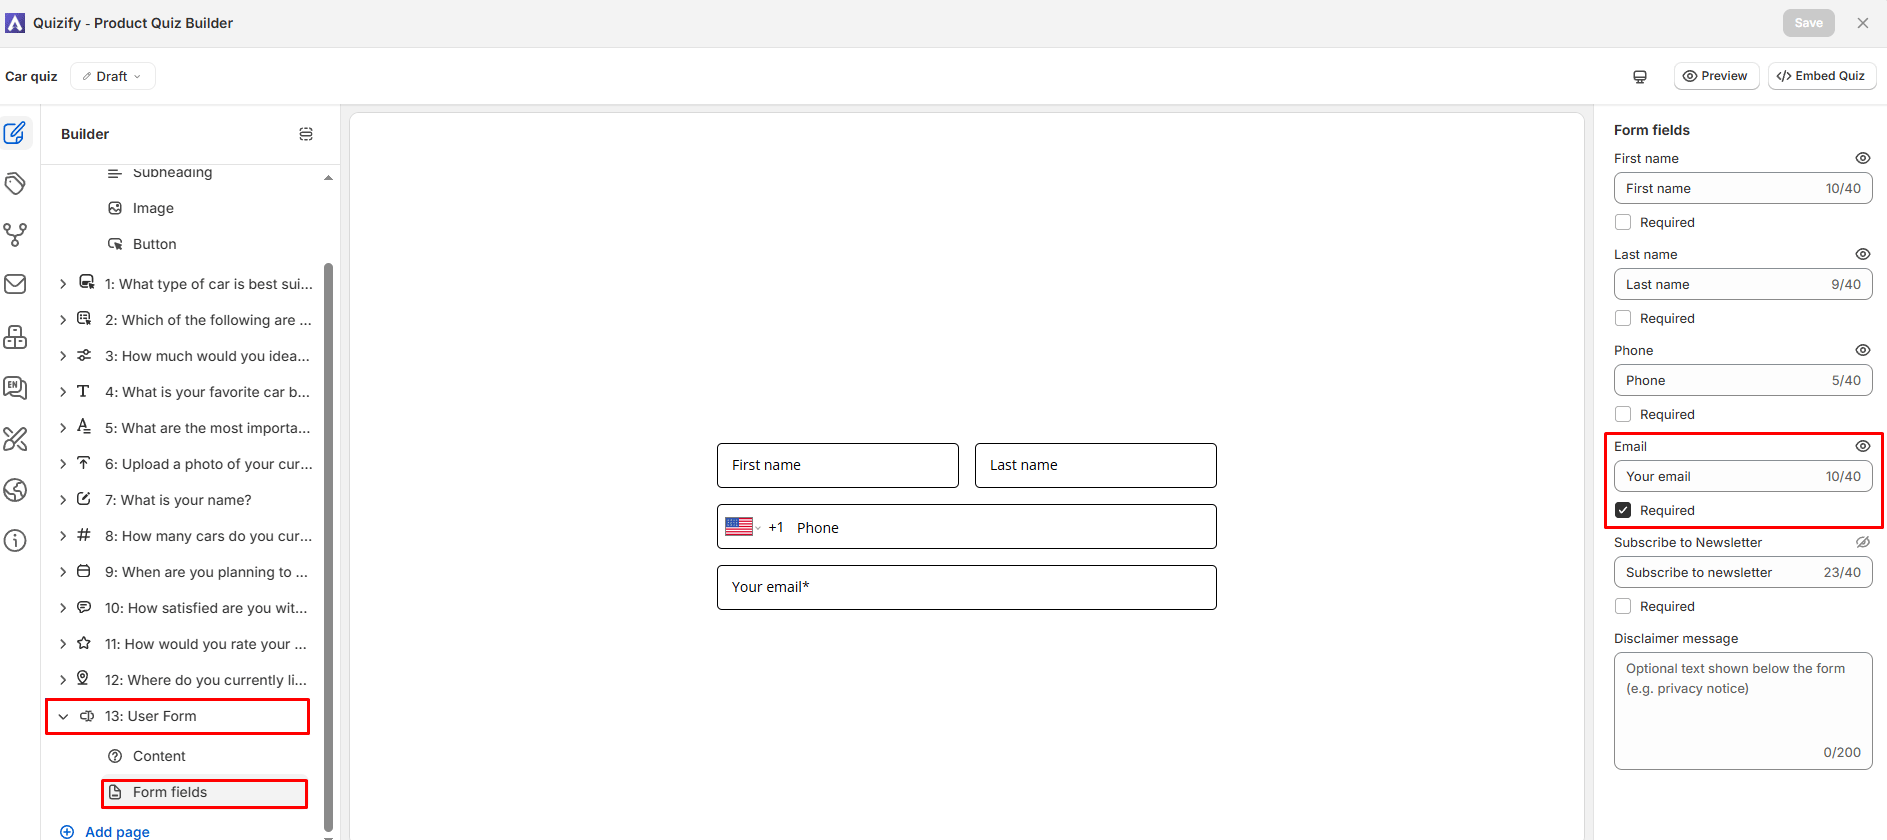
- First Name
- Last Name
- Phone Number
- Address
- Answer Tags (mapped to question responses)
2. Connect Omnisend with Quizify
Once your quiz is ready, connect your Omnisend account:- Open your quiz in Quizify.
- Go to the Integration tab.
- Select Marketing and choose Omnisend.
- Enter your Omnisend API Key.
3. How to Get Your Omnisend API Key
To generate your API key in Omnisend:- Log in to your Omnisend account.
- Click your account/brand profile icon in the top-right corner and select Store settings.
- In the left sidebar navigation, click Integrations & API and select API keys.
- Click the Create API Key button.
- Enter an identifiable name for your key (e.g.
Quizify App). - Select permissions: choose Full access or custom permissions with Contacts (create and update access enabled).
- Click Save.
- Copy the generated API key.
- Return to Quizify, paste the key into the API key field, and click Connect.
Note:- Copy and save your API key immediately after generating it. For security reasons, Omnisend will not display the key again once you leave that page.
4. Select Omnisend List
- After your API key is validated, Quizify will automatically fetch and display the contact lists available in your Omnisend account.
- From the dropdown, select the target Omnisend List where new quiz leads should be added.
- Click on Update to initiate and activate synchronization of user records with the chosen Omnisend list.
Note:-
- Quizify will sync lead contact details and attach quiz answer tags directly to subscriber profiles in Omnisend.
- You can update the chosen list or click Disconnect at any time if you need to pause sync or switch accounts.
5. What Data Quizify Syncs with Omnisend
Depending on the fields enabled in your quiz User Form and question settings, Quizify can sync the following customer data:
This data allows you to create targeted Omnisend segments and personalize your email marketing campaigns with precision.
6. Turn Quiz Responses into Targeted Email Campaigns
The real benefit of connecting Quizify with Omnisend is what you can do with the data after it is synced. Instead of treating every lead the same, you can use the rich information collected through your quiz to create a personalized marketing experience:- Segment users based on their interests: Group contacts by the specific answers they chose in your quiz (e.g., skin concerns, fitness goals, dietary preferences).
- Create personalized email campaigns: Greet new subscribers with dynamic email copy and recommendations tailored to their quiz results.
- Send follow-up emails to specific groups: Deliver specialized promotional offers or educational tips to targeted customer segments.
- Build automated customer journeys: Trigger automated multi-step welcome workflows in Omnisend the moment a lead finishes the quiz.
- Deliver more relevant product recommendations: Re-engage shoppers with emails showcasing the exact products recommended on their quiz result page.
Troubleshooting
Leads are not appearing in Omnisend
Leads are not appearing in Omnisend
- Ensure your quiz contains a User Form slide with the Email field set to required.
- Check that your Omnisend API key has permissions to create and update Contacts.
- Confirm that your Omnisend API key is active, valid, and has not been revoked.